Project Management
Project Management
Project Management Overview
Project Documents
ProjectManagementDoc.com provide a excellent set of document templates for project managment. These template follow the PMBOK (Project Management Book of Knowledge) strategy and are designed for use with large projects. You should familiarize yourself with all of the document templates. For this project, you will need only a few documents.
Project Management Planning
Download the Project Management Plan, which can be found at:
- ProjectManagementDocs.com → Project Planning → Project Managment Plan → Download Template
- Project Managment Plan (direct download)
- Project Managment Plan (locally)
Notes for the Project Managment Plan
- Introduction
- The Introduction provides a high level overview of the project and what is included in this Project Management Plan. This should include a high level description of the project and describe the projects deliverables and benefits. Excessive detail is not necessary.
- Customer Questions:
- Current state of business affairs
- Explanation of events leading to the need for the project
- Description of the new opportunity that requires the project
- Other information needed to understand the purpose of the project
- Project Management Approach
- This section should describe, in general terms, the roles and authority of project team members. It should also include which organizations will provide resources for the project and any resource constraints or limitations. For this project, little additional detail is needed.
- Project Scope
- State the scope of the project in this section of the Project Management Plan. The scope statement from the project charter should be used as a starting point; however, the project plan needs to include a much more detailed scope than the charter. This detail should include what the project does and does not include. The more detail included in this section, the better the product. This will help to clarify what is included in the project and help to avoid any confusion from project team members and stakeholders.
- Customer Questions:
- What are we trying to achieve?
- When is the time deadline?
- What are the goals of the project?
- What will success look like? What are the key success criteria for the project?
- What are the deliverables? (hardware, software, documentation, training, etc.)
- What items fall outside the scope of this project
- What areas of the existing system are functioning properly? What needs to be improved?
- What are the assumptions for the project?
- What are the risks for the project?
- What are the dependencies in the project?
- Milestone List
- Provide a summary list of milestones including milestone name, description and completion dates. Only the high level milestones are required here. You will develop these milestones based on your understanding of the project.
- Schedule Baseline and Work Breakdown Structure
- This section of the Project Management Plan should discuss the WBS, WBS Dictionary, and Schedule baseline and how they will be used in managing the project’s scope. Since we will be using a scheduling tool for this project, the actual WBS project and Gantt charts will be created in the tool. You will use the tool to schedule the project, then simply detail the task name, task description, and scheduled start/end dates here.
- Change Management Plan
- This part of the Project Plan should describe your change control process. Your process should have the following steps:
- Document the change
- Assess impact of change on the project plan (both time and budget
- Present impact to project sponsor for decision
- Discuss impact of change with the customer
- If change is approved by the customer, then update all project documentation and estimates
- This part of the Project Plan should describe your change control process. Your process should have the following steps:
- Communications Management Plan
- The purpose of the Communications Management Plan is to define the communication requirements for the project and how information will be distributed to ensure project success. For this project, you will give a weekly report to your instructor using the project status template (see above). You should arrange the frequency of the project status report with your customer, probably 2 or 3 times during the project with a final demonstration
- Cost Management Plan
- The Cost Management Plan clearly defines how the costs on a project will be managed throughout the project’s lifecycle. Since there are no costs associated with your work, this section is not needed.
- Procurement Management Plan
- The Procurement Management Plan should be defined enough to clearly identify the necessary steps and responsibilities for procurement from the beginning to the end of a project. For a small project such as this, all that is neccessry is to identify anything that must be purchased and when the purchase is triggered. This could include domain names, hosting services, templates, themes, and any expendables.
- Project Scope Management Plan
- It is important that the approach to managing the projects’ scope be clearly defined and documented in detail. Failure to clearly establish and communicate project scope can result in delays, unnecessary work, failure to achieve deliverables, cost overruns, or other unintended consequences. For a small project such as this, hopefully the Change Management mechanism will be sufficient.
- Schedule Management Plan
- This section of the Project Plan provides a general framework for the approach which will be taken to create the project schedule. Effective schedule management is necessary for ensuring tasks are completed on time, resources are allocated appropriately, and to help measure project performance. This section of the Project Plan should include discussion of the scheduling tool/format, schedule milestones, and schedule development roles and responsibilities. In this project, you will be responsible for scheduling resources so that hard dates for milestones are met. Little additional documentation is needed.
- Quality Management Plan
- This portion of the Project Management Plan Template discusses how quality management will be used to ensure that the deliverables for the project meet a formally established standard of acceptance. For a small project, you will simply state that each deliverable will be tested/reviewed by staff and the customer.
- Risk Management Plan
- This part of the Project Plan provides a general description for the approach taken to identify and manage the risks associated with the project. There are few risks associated with a small project, so this may section may be omitted.
- Risk Register
- State any risks involved, their probabilty of occurring, their impact, and any possible mitigation.
- Staffing Management Plan
- Here the Project Plan Template discusses how you plan to staff the project. For a small project with few team members, this section can be ommitted. HOWEVER, for planning purposes, each team member should commit to 10 hours per week working on the project. If there are four staff members with ten weeks remaining in the project, that means you have 400 person-hours to expend onthe project. Can you get the project done with those resources?
- Resource Calendar
- Each team member will commit to 10 hours per work per week (or more) to complete the project. This section can be ommitted.
- Cost Baseline
- Not needed for small projects.
- Quality Baseline
- Not needed for small projects.
- Sponsor Acceptance
- Introduction
- Project Management Approach
- Project Scope
Developing the Work Breakdown Structure
Download the Work Breakdown Structure (WBS), which can be found at:
- ProjectManagementDocs.com → Project Planning → Work Breakdown Structure (WBS) → Download Template
- Work Breakdown Structure (WBS) (direct download)
- Work Breakdown Structure (WBS) (locally)
Get Started with the WBS
One of the best ways of project planning involves a multi-hour session with all the key people present, using two colors of post-it notes and a white board to map out what needs to be done, when and by whom. Simple, but effective.
The process should run something like this:
- Using one color of post-it notes, write down all the milestones that you need to achieve on the way to the project outcome, and number them in chronological order. Stick them all down the left hand side of the board.
- For each milestone, identify any others that need to be achieved first, before that one can be either started or finished (precursors) and write them on the post-it note for that milestone.
- Now on a different color of post-it notes, identify all the tasks that need to be done to achieve each milestone. Use common sense to decide what level of granularity you want to work at. For example, if your overarching project is a recruitment exercise, you’ll want to spell out each step, from preparing job descriptions, through advertising, sifting, interviewing, carrying out checks, and offering the job. However, for a much larger project, you might include a task to ‘recruit project administrator’.
- For each task, identify which milestones they feed and write the milestone number on the post-it for the task. Write the feeder tasks on the post-it for each milestone.
- Identify how long each task (in person-hours) is going to take and write it on the task post-it.
- Identify what resources you need to achieve each task, and write it on the post-it.
- Take pictures of the post-it notes with your camera, as you will need it for the next session
Using Gantter to Schedule Your Project
www.gantter.com is a free, web-based project management tool that allows you to take your Work Breakdown Structure and interactively schedule your project. All enterprise project management system, including Microsoft Project, Primavera, and others use the same techniques found in Gantter. Help about Gantter can be found at https://www.gantter.com/help, and video tutorials are located at https://www.gantter.com/help/videos.
Create a Gantter Account
Using the Chrome browser, navigate to http://www.gantter.com. Next:
- In the upper right, click gantter editions
- In the Google Drive column, click Start Now and follow the procedure to set up an account. You will have probably have to sign-in to your UALR account.
Connect Gantter to your Google Drive
New Project - When you create a new chart and then save it to Google Drive, Gantter saves it to the root of your Google Drive with a filetype of .gantter. You can move this file to a shared directory so everyone in the project can have access to it.
Existing Project - To open an exiting project, you can:
- Open Google drive, locate the .gantter file, and double click it. (It should open with the gantter app), or
- Start Gantter from the Gantter home page, then under Project, click on "Open from Google Drive". Gantter will search your entire Google Drive for .gantter files. You can select the file to open.
Caution: While you can easily share a Gantter project file using Google Drive, multiple users should not try to simultaneously edit the project file.
Creating a Gantter Project
Let's create your first project.
- Click Project→New to ensure you have a new blank project
- Click Save as. On the Save File dialog, click on your Google Provider. Your should see your Google Drive file. Navigate to the appropriate directory, then enter the name of the file in the textbox at the top of the dialog box. When complete, click Save
- You are now editting a blank project, the main screen, click Autosave: On. The will force Gantter to save changes as you make them instead of you having to do a manual save. It will say "Autosave to File Central: ON", but it is actually saving to your Google Drive.
- If you want to open an existing file, click Project→Open, select the Google provider, navigate to the appropriate directory and select the appropriate file (normally a .gantter extension), then click Open.
Entering Work Breakdown Structure into Gantter
There is a normal order to entering the WBS information into Gantter, so I suggest the following order:
- Project Properties - Click Project→Properties. On the General tab, give your project a name and an initial start date (the first date in the project). Click Save.
- Columns to view - Click View, and select only the following columns for visibility:
- WBS Column
- Info Column
- Work Column
- Predecessor Column
- Resource Column
- Enter Tasks - By now, you should know the tasks associated with your project. Gannter enables you to enter in tasks and adjusts the hierarchy. Use the up/down arrows to move a task, and the left/right arrows to indent a task and make it a subtask within a task. You should enter the following project tasks:

- Enter Work Hours- for each elementary task, enter the number of hours required to perform the task. Always use hours, so for 6 hours enter "6h". If you enter 8 hours, then that means that 1 person can perform the task in 8 hours, and 2 people can perform the task in 4 hours. If you are scheduling a task with a fixed amount of time, such as a meeting, then mutiply the task time by the number of attendees. In other words, if a meeting lasts 2 hours and requires 3 people in attendence, then enter 6 hours. You will see that the subtasks are totaled into the appropriated tasks.
- Enter Calenders for your Team - on the left side of the main screen, click the Calenders button. By default, Gantter create 3 calendars, Standard, 24 Hour, and Night Shift. Delete the 24 Hour and Night Shift using the "Cut" function. Now, add a customn calender for each member of your team, call them "John Smith - Part Time". By default, a new calendar assumes the you will work 8-12 and 1-5 five days a week. You will want to change the calendar so that each staff member works 2 hours a day, say 8am to 10am. Double click the number to the left of the calendar name. Click the dropdown box. Select Sunday and clear the working dates; select Saturday and clear the working dates; and select the weekday ans set the working time from 8am to 10am. For this exercise, create an employee calender for John Smith and Jane Doe.
- Create Resources - Each member of your team is a resource. Click on the Resources tab, and add each member of your team. On the right side dropdown, select the base calender dropdown and select the calender associated with that team member.
- Set Predecessors for Obvious Tasks - You will note that certain groups of task must occur sequentially. In this project we know the following order: Project Initiation→Project Planning→Project Development→Project Final Testing→Project Completion. Click the Predecessors column for the Project Planning task, then select the Project Initiation task (2). This means that the Project Initiation Task must comlete before the Project Planning task can start. Complete the predecessors for Project Development, Project Final Testing, and Project Completion. You can also set predessors for other tasks. Note that all of the task within Project Initiation, Project Planning, and Project Completion are all sequential. Gantter provides a simple method to assign serial predecessors. Hold down the control key, select Formulate Questions and Meet With Customer, then click the Link button. This automaticall assigns predecessors. Report for the tasks in Project Planning and Project Completion. We will leave Project Development alone for know, as we hope that mutiple tasks can be worked on simultaneously
- Set Predecessors for Subtasks - Let's assume the following occur sequentially:
- Formulate Questions→Meet With Customer
- Create Project Managment Plan→Create Work Breakdown Structure→Create Gantt Chart and Project Schedule→Review Project Plan with Customer
- Final Demostration of Website→Install Website→Customer Acceptance
- Note: in Project Development, we will let all tasks occur simultaneously.
- Assign Resources - Finally, we get to assign our resources to the tasks. In the resources column and Formulate Questions row, click and assign the staff that will be working on that task. You can assign multiple staff to the project. Assign the staff as shown:
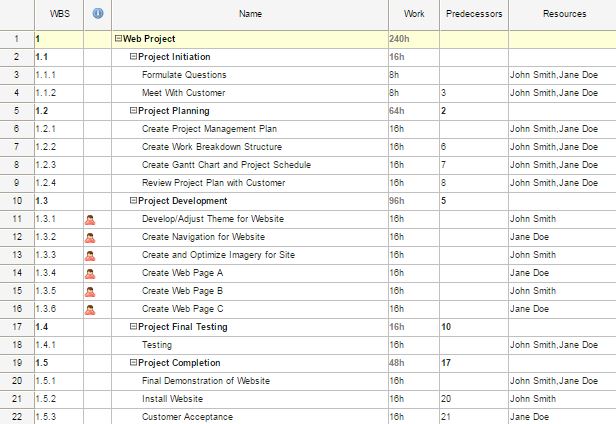
Whoa, what's going in the information column? When you hover over the symbol, it says "Task has overloaded resources assigned". The reason for this is John Smith is working on 3 tasks at the same time. You will need to set predecessors for these three task so that they happen sequenctially. Jane Doe has the same problem with 3 tasks. Assign the prececessors as show. Also, on the View tab, click show Start Column and Finish Column. Your project should look like this: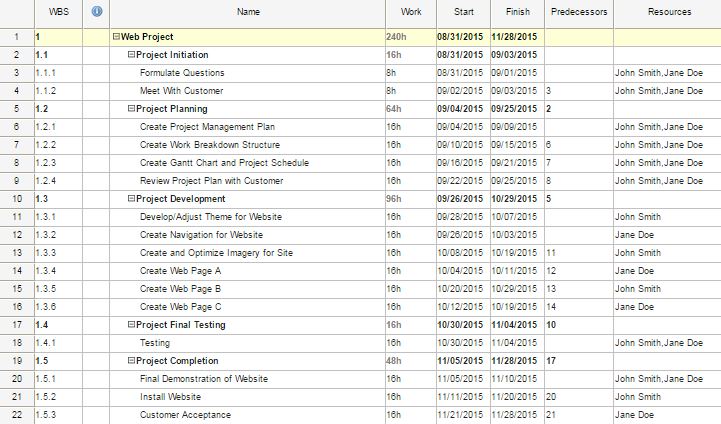
Finished Project - in case you took a wrong turn, you can download the finished chart by saving: Web Project Gantt Chart.