ITEC 3650 - Guided Application in IT and Industry Processes
CSTEM Events
Presentations
- Meet in the CSTEM Auditorium
- Project Presentations
January 16, 2024
Introduction to JavaScript
- W3Schools JavaScript Home
- JS Introduction
- JS Where To
- JS Output
- JS Syntax
- JS Statements
- JS Statement Reference
- JS Comments
- JS Variables
- JS Operators
- JS Operators Reference
- JS Arithmetic
- JS Assignment
- JS Data Types
- isNaN Function- Not a Number function
- parseInt Function - Converts a string to an integer
- parseFloat Function - Converts a string to a floating number
- String Function - Converts a value to a string
- JS Popup Alert
- JS Style Guide
- JS Best Practices
- JS Mistakes
Examples
- Update a Web Form Value - Example 1
- Update a Web Form Style - Example 2
- Display a Message - Example 3
- Prompt for a Value - Example 4
- Add 2 Integers - Addition of 2 Integers
January 18, 2024
HTML Document Object Model (DOM)
JavaScript Functions
Document Events
Input Type = "Text"
<script src="https://ajax.googleapis.com/ajax/libs/jquery/3.4.1/jquery.min.js"></script>
<script src="https://cdn.jsdelivr.net/npm/jquery-validation@1.19.1/dist/jquery.validate.min.js"></script>
<script src="https://cdn.jsdelivr.net/npm/jquery-validation@1.19.1/dist/additional-methods.min.js"></script>
<style>
   .error {
        color: red;
        padding-left: 5px;
   }
</style>
<form id="TextExampleDOMForm" onsubmit="return false">
<input type="submit" value="SubmitExample" Name="SubmitButton" onclick="TextExample()">
<label for="txtName">Name: </label>
<input type="text" id="txtName" name="txtName" size="20" maxlength="20"
    data-rule-required="true"  data-msg-required="Name is Required" >
<label for="txtName" class="error"></label>
<label id="SubmitExampleValue"></label>
<script>
function TextExample()
{
    document.getElementById("SubmitExampleValue").innerHTML = document.getElementById("txtName").value;
}
$( "#TextExampleDOMForm" ).validate({

});
</script>
</form>
Input Type="Select"
<script src="https://ajax.googleapis.com/ajax/libs/jquery/3.4.1/jquery.min.js"></script>
<script src="https://cdn.jsdelivr.net/npm/jquery-validation@1.19.1/dist/jquery.validate.min.js"></script>
<script src="https://cdn.jsdelivr.net/npm/jquery-validation@1.19.1/dist/additional-methods.min.js"></script>
<style>
   .error {
        color: red;
        padding-left: 5px;
   }
</style>
<form id="SelectExampleDOMForm" onsubmit="return false">
<input type="submit" value="SelectExample" name="SelectButton" onclick="SelectExample()">
<label>Auto: </label>
<select name="selAuto" id="Auto"
        data-rule-required="true" data-msg-required="Auto is Required">
    <option value="">Select an Auto...</option>
    <option value="Volvo">Volvo (Latin for 'I roll')</option>
    <option value="Saab">Saab (Swedish Aeroplane AB)</option>
    <option value="Mercedes">Mercedes (Mercedes-Benz)</option>
    <option value="Audi">Audi (Auto Union Deutschland Ingolstadt)</option>
</select>
<label for="selAuto" class="error"></label>
<span id="SelectExampleValue"></span>
<script>
function SelectExample()
{
    document.getElementById("SelectExampleValue").innerHTML = document.getElementById("selAuto").value;
}
$( "#SelectExampleDOMForm" ).validate({

});

</script>
</form>
Summary
- If you are using jQueryValidation and do not want to submit it to another webform, use
onsubmit="return false"in the <form> tag. - If you are using jQueryValidation use the following to make sure that the form is valid (Assuming <form id="myform">):
if ($(#myform).valid()) { - To skip validation while still using a submit-button, add the attribute "formnovalidate" to that input:
<input type="submit" formnovalidate name="cancel" value="Cancel"> - Use
document.getElementByID("myText").valueto get/set the value in an input field, such as<input type = "text" id="myText"> - Use
document.getElementByID("myText").innerHTMLto get/set the value of HTML elements, such as<div id = "myText"> - You can change the value of an attribute of an HTML element, such as
document.getElementById("myImage").src = "landscape.jpg"; - You can change the value of the style of an HTML element, such as
document.getElementByID("myText").style.color = "blue"; - Remember that anything you time into the keyboard is the data type character. You cannot do arithmetic on the input unless you convert it using the parseInt() or parseFloat() function
January 23, 2024
JavaScript Debugging
- JS Debugging
- Chrome Debugging
- On the Chrome Tool Bar, press the 3 vertical dots->More Tools->Developer Tools
- On the Debugger Tool Bar, press "Sources" to see the source code, then select the source file from the directory tree on the left. You may have to click "Refresh" to see the sourse.
- On the Debugger Tool Bar, press the 3 vertical dots->Dock Side->Dock to Bottom
- On the Debugger Tool Bar, press the 3 vertical dots->Show Console Drawer. When the console drawer appears, make sure that the console tab is clicked and not "What's New".
- Hypotenuse of a Right Triangle
- Hypotenuse of a Right Triangle (using proper folders)
Assignment - Due in February 9 - for a circle with a given Radius, you can make the following calculations:
- Diameter = 2 times Radius
- Circumference = 2 times pi times Radius
- Area = pi times Radius times Radius
- Note that in javascript, pi is represented by "Math.PI"
Create a javascript program that
- Prompts for Radius Value
- Validates the Radius Value to ensure that it is a valid, positive real number (Use jQueryValidation)
- When the calculate button is pressed, the program
- Converts the string representaion of the number to a floating point number (Use parsefloat)
- Calculates the Diameter, Circumference, and Area of a Circle by creating and using the following functions:
- calcDiameter - accepts the Radius as a parameter and returns the Diameter
- calcCircumference - accepts the Radius as a parameter and returns the Circumference
- calcArea - accepts the Radius as a parameter and returns the Area
- Displays the Diameter, Circumference and Area of the circle
- When the Reset button is pressed, the program calls a function named clearForm that clears the Radius and results
Create a project called Circle and put your solution in index.html. Here's a starter file.
January 25, 2024
Work on Circle Assignment - JavaScript Debugging - Continued
January 30, 2024
If...Then...Else
Examples
Type = "Radio"
<script src="https://ajax.googleapis.com/ajax/libs/jquery/3.4.1/jquery.min.js"></script>
<script src="https://cdn.jsdelivr.net/npm/jquery-validation@1.19.1/dist/jquery.validate.min.js"></script>
<script src="https://cdn.jsdelivr.net/npm/jquery-validation@1.19.1/dist/additional-methods.min.js"></script>
<style>
   .error {
        color: red;
        padding-left: 5px;
   }
</style>
<form id="RadioExampleValidationCheckForm" onsubmit="return false">
<input type="submit" value="RadioExample" name="RadioButton" onclick="RadioExample()">
<label>Cars: </label>
<label for="rdChevrolet"><input type="radio" id="rdChevrolet" name="rdcar" value="Chevrolet"
    data-rule-required="true" data-msg-required="Car is Required" />Chevrolet</label>
<label for="rdFord"><input type="radio" id="rdFord" name="rdcar" value="Ford" />Ford Motor</label>
<label for="rdDodge"><input type="radio" id="rdDodge" name="rdcar" value="Dodge" />Dodge Ram</label>
<label for="rdcar" class="error"></label>
<span id="RadioExampleValue"></span>
<br>
</form>
<script>
function RadioExample() {
    if (document.getElementById("rdChevrolet").checked) {
        document.getElementById("RadioExampleValue").innerHTML =
            document.getElementById("rdChevrolet").value;
    }
    if (document.getElementById("rdFord").checked) {
        document.getElementById("RadioExampleValue").innerHTML =
            document.getElementById("rdFord").value;
    }
    if (document.getElementById("rdDodge").checked) {
        document.getElementById("RadioExampleValue").innerHTML =
            document.getElementById("rdDodge").value;
    }
}

$( "#RadioExampleValidationCheckForm" ).validate({

});
</script>
Type = "Checkbox"
<input type="submit" value="CheckboxExample" name="CheckboxButton" onclick="CheckboxExample()">
<label>Fruits: </label>
<label for="ckApple">
    <input type="checkbox" name="ckfruit1" id="ckApple" value="Apple">Red Apple</label>
<label for="ckPear">
    <input type="checkbox" name="ckfruit2" id="ckPear" value="Pear">Green Pear</label>
<label for="ckBanana">
    <input type="checkbox" name="ckfruit3" id="ckBanana" value="Banana">Yellow Banana</label>
<span id="CheckBoxExampleAppleValue"></span>
<span id="CheckboxExamplePearValue"></span>
<span id="CheckBoxExampleBananaValue"></span>
<script>
function CheckboxExample() {

    document.getElementById("CheckBoxExampleAppleValue").innerHTML = "";
    document.getElementById("CheckboxExamplePearValue").innerHTML = "";
    document.getElementById("CheckBoxExampleBananaValue").innerHTML =  "";

    if (document.getElementById("ckApple").checked) {
        document.getElementById("CheckBoxExampleAppleValue").innerHTML =
            document.getElementById("ckApple").value;
    }
    if (document.getElementById("ckPear").checked) {
        document.getElementById("CheckboxExamplePearValue").innerHTML =
            document.getElementById("ckPear").value;
    }
    if (document.getElementById("ckBanana").checked) {
        document.getElementById("CheckBoxExampleBananaValue").innerHTML =
            document.getElementById("ckBanana").value;
    }
}
</script>
If..Then..Else Example
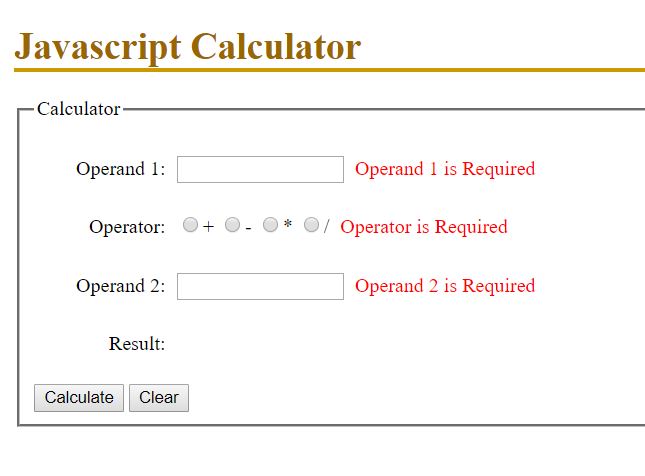
Assignment - Due February 15 - Create a new project called Calculator. As closely as possible, create the web form shown the image below in your workspace. When complete, you should be a calculator that let's you add, subrtract, multiply, and divide two numbers. The operands are required and should be numeric floating point. Display error messages as appropriate. The clear button should clear all inputs, error messages and results. Hint: Make a copy of the MinMaxAvg project and get it to work in your workspace, then modify it for this assignment.
February 1, 2024
Programming Lab
- Work on Calculator Assignment
February 6, 2024
JQuery
February 8, 2024
Asynchronous JavaScript and XML (AJAX)
AJAX Examples
- URL: http://brucebauer.info/assets/ITEC3650/gethint.php
- Parameters:
- Name: Partial name to lookup
- Invoking gethint.php: https://brucebauer.info/assets/ITEC3650/gethint.php?Name=E
- Example of using gethint.php
- Another AJAX Example - AJAX Javascript Calculator
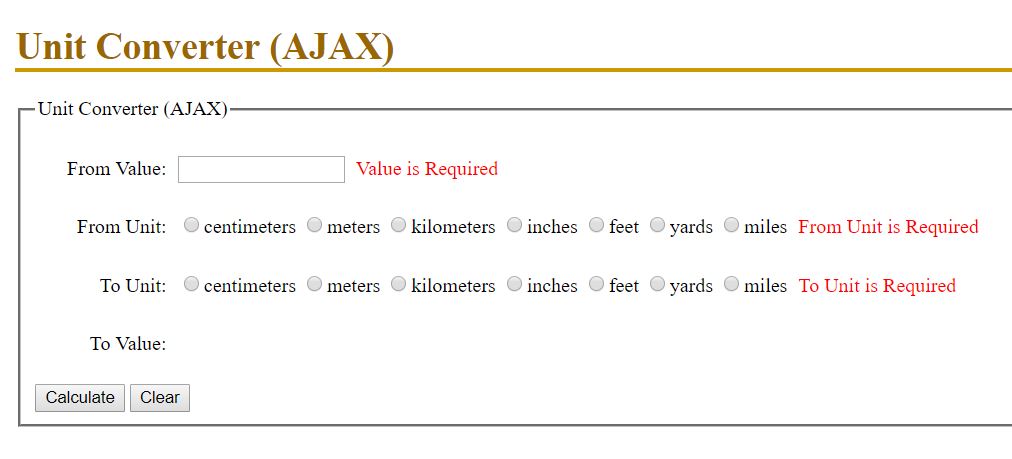
Assignment - Due February 20 at midnight - Create a new project called unitsconversion. Create index.html, and an assets, script, and style subfolders. As closely as possible, create the web form using the image below. When complete, you should prompt for a numeric value, the value's units (call "FromUnits") and the units to convert the value to (called "ToUnits"). When the calculate button is pressed you will make an AJAX call to a webpage that will do the conversions for you. The value is required and should be numeric. The FromUnit and ToUnit are required. Display error messages as appropriate. The clear button shold clear all inputs, error messages and results.
- URL - https://brucebauer.info/assets/ITEC3650/unitsconversion.php
- FromValue - The number to be converted
- FromUnit - The unit of the FromValue, must be one of the following:
- cm - centimenters
- m - meters
- km - kilometers
- in - inches
- ft - feet
- yd - yards
- mi - miles
- ToUnit - The unit that you want to convert the FromValue to, must be one of the following:
- cm - centimenters
- m - meters
- km - kilometers
- in - inches
- ft - feet
- yd - yards
- mi - miles
To see the operation of the webpage, try: Example of Calculation - Converts 10 cm to in (3.937007874 in)
February 13, 2024
CSTEM Job Fair
- Attend the CSTEM Job Fair at the Stephens Center 12pm to 3pm
- Click here to register.
February 15, 2024
Programming Lab
- Work on AJAX Assignment
February 20, 2024
Arrays and Loops
JSON - Javascript Object Notation
JSON Example - Polygon.io Stock Data
- Polygon.io - Click on "Documentation", "Market Data", "Ticker Details"
- Example of using Polygon.io to Retrieve Ticker Details
February 22, 2024
JSON Example - Polygon.io Stock Data
- Polygon.io - Click on "Documentation", "Market Data", "Ticker Details" and "Aggregates (Bars)"
- Example of using Polygon.io Stock Data to Retrieve Stock Data and Charts
Chart.js
Here is the simplest code to chart dates and values:
var ctx = document.getElementById("chartjs-0");

var myChart = new Chart(ctx, {
    "type":"line",
    "data": {
        "labels": dates,
        "datasets":[{
            "data": values,
            fill: false
        }]
    },
    "options":{
        responsive: false,
        maintainAspectRatio: true,
    }
});
Assignment - Due March 7 - Review the documentation for Currency Value Conversion, known as FOREX, located at https://polygon.io/docs/forex/getting-started. You will need to signup for an api token. You can see all the currency symbols at http://eoddata.com/stocklist/FOREX.htm.
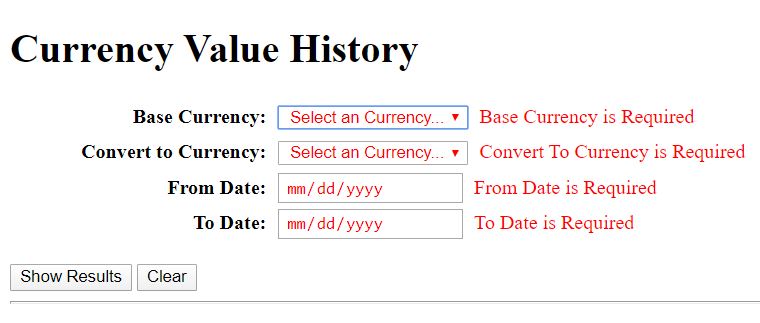
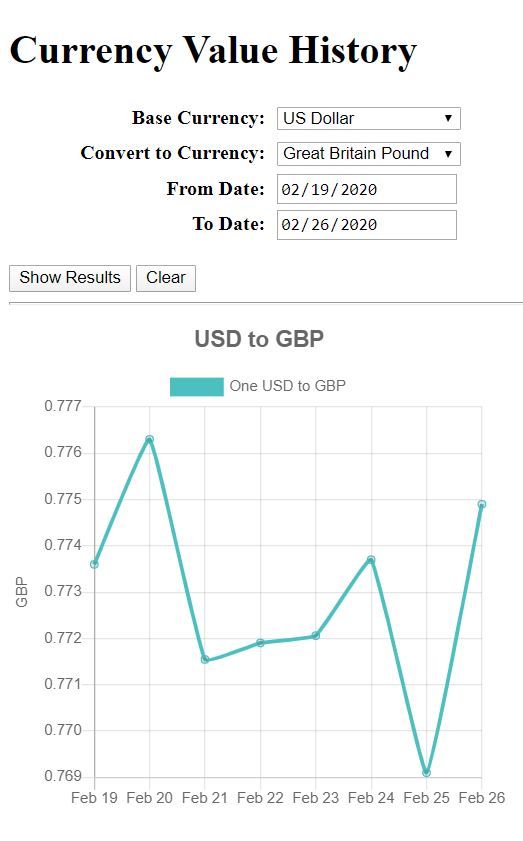
Create a project called Currency Value History. As closely as possible, create the web form using the images below. Your application should let the user select at least 5 currencies (including US Dollars) to convert from and to. You should also prompt for from and to dates. The application should construct a URL and make an AJAX call to the Polygon.io Forex data. You should use chart.js to graph the data. All of the input data is required. Display error messages as appropriate. The clear button should clear all inputs, error messages and results.
February 27, 2024
Programming Lab
- Work on Currency Value Conversion Assignment
Febrary 29, 2024
JavaScript Technical Assessment - Mars Rover Photo Database
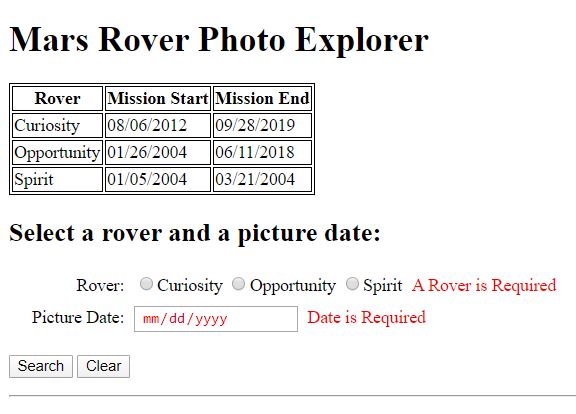
Assignment - Due March 14 - Review the documentation for Mars Rover Photo Database, located at https://api.nasa.gov. Review the limitations on the number of requests you can use with the DEMO api key.
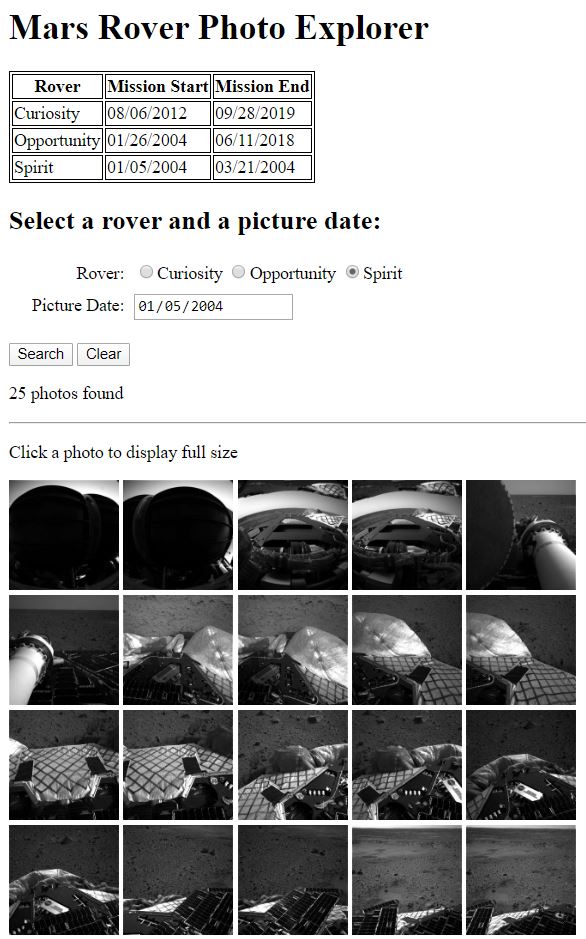
Create a new project called Mars Rover Photo Explorer. As closely as possible, create the web form using the images below. Your application has the following requirements:
- Display the mission start and end dates for each rover.
- Using three radio buttons, prompt for a rover. Display an error message if no rover is selected.
- When a rover is selected, update the photo date with the first day of the mission. Hint: use the onchange event on each radio button, then set the value of the phone date based on which button was pressed.
- Prompt for a date using a calendar widget. Display an error message if no date is entered.
- Make an AJAX call to the api.nasa.gov with the appropriate parameters to return the first 25 photos for that date.
- Display a thumbnail of the first 25 photos. Hint: In your HTML, create 25 invisible images. You will loop through the data and set the source of the photo to the URL of the photo in the database.
- Display the number of photo found on that day. Hint: use the length property
- You will also need to set the "tooltip" for the photo as the name of the camera for the photo.
- Make the thumbnail clickable, so that the full photo is display when the thumbnail is clicked.
- Display the number of photos found
- You may find days that have less that 25 photos. If you have 25 photos on one day, then the next day has 20 photos, you wil have to clear out the last 5 photos.
- Create a Clear button to clear out any error messages.
- Please spend some time and nicely style this site. You can use your SpaceX theme if you like.
- Assuming your images are ID'd as image1, image2, etc, here is a code snippet that will help:
for (i = 0; i < 25; i++) {
    // Note how we construct the name for image1, image2, etc...this sets the image source
    document.getElementById("image" + i).src = msg.photos[i].img_src;
    do something to set the tool tip = msg.photos[i].camera.full_name;
}
March 5, 2024
JavaScript Technical Assessment - Mars Rover Photo Database
- Continue to work on Mars Rover Photo Database
March 7, 2024
Project Management Overview
Project Documents
ProjectManagementDocs.com provides a excellent set of document templates for managing a large projects.
- Project Initiation —> Project Charter (Single Page Version)
- Project Initiation —> Project Charter (Multi-Page Version)
March 12, 2024
Project Management Overview
Project Management - Work Breakdown Structure
Review the Work Breakdown Structure (WBS), which can be found on ProjectManagementDocs.com at:
- Project Planniing —> Work Breakdown Structure
Example Project Management Documents
Get Started with the WBS
One of the best ways of project planning involves developing a kanban (billboard in Japanese) for all of the requirements in the project. Using two colors of post-it notes and a white board to map out what needs to be done, when and by whom. Simple, but effective.
The kanban process should run something like this:
- Using one color of post-it notes, write down all the milestones that you need to achieve on the way to the project outcome, and number them in chronological order. Stick them all down the left hand side of the board.
- For each milestone, identify any others that need to be achieved first, before that one can be either started or finished (precursors) and write them on the post-it note for that milestone.
- Now on a different color of post-it notes, identify all the tasks that need to be done to achieve each milestone. Use common sense to decide what level of granularity you want to work at. For example, if your overarching project is a recruitment exercise, you’ll want to spell out each step, from preparing job descriptions, through advertising, sifting, interviewing, carrying out checks, and offering the job. However, for a much larger project, you might include a task to ‘recruit project administrator’.
- For each task, identify which milestones they feed and write the milestone number on the post-it for the task. Write the feeder tasks on the post-it for each milestone.
- Identify how long each task (in person-hours) is going to take and write it on the task post-it.
- Identify what resources you need to achieve each task, and write it on the post-it.
- Take pictures of the post-it notes with your camera, as you will need it for the next session
Preparing for Your Meeting
In preparation for the meeting with your client, review the following project management documents at ProjectManagementDocs.com:
- Project Initiation → Project Charter (Single Page Version)
- Project Initiation → Project Charter (Multi-Page Version)
- Project Planning → Work Breakdown Structure
- Project Planning → Communications Management Plan
- Project Planning → Change Management Plan
- Project Monitoring and Controlling → Project Status Reporting
- Project Closure → Project Transition-Out Plan
Review the following materials:
- 10 Questions to Ask in Your Next Client Interview
- 6 Client Interview Questions You Should Be Ready and Raring to Answer
- 100 Questions You Must Ask When Developing a Website
March 14, 2024
Project Management - Using Trello to Schedule Your Project
www.trello.com is a freemium, web-based ect management tool that allows you to take your Work Breakdown Structure and interactively schedule your project. All enterprise project management system, including Microsoft Project, Primavera, and others use the same techniques found in Trello.
Create a Trello Account
Navigate to https://www.trello.com and create an account
Create a Example Project
- On the top menu bar on the left, click Boards. Scroll to the bottom of the menu and click Create New Board
- Name your BoardYour Name - Sample Web Project and select "No Team". Select a solid color for the background.
- On the right of the screen, click Show Menu then More then Labels. Edit the labels as follows (be sure to put the number):
- Green Label - 1. Project Initiation
- Yellow Label - 2. Project Planning
- Salmon Label - 3. Project Development
- Red Label - 4. Project Testing
- Purple Label - 5. Project Completion
- Create the following lists and cards within the list:
- Project Complete
- Web Project in Progress
- Project Initiation
- Formulate Questions for Customer (label: Project Initiation)
- Meet with Customer (label: Project Initiation)
- Project Planning
- Create Work Breakdown Structure (label: Project Planning)
- Create Gantt Charts and Project Schedule (label: Project Planning)
- Create Project Management Plan (label: Project Planning)
- Project Development
- Develop theme for website (label: Project Development)
- Create and optimize imagery (label: Project Development)
- Create navigation for website (label: Project Development)
- Create webpage A (label: Project Development)
- Create webpage B (label: Project Development)
- Create webpage C (label: Project Development)
- Project Testing
- Final website testing (label: Project Testing)
- Project Completion
- Final website demonstration for customer (label: Project Completion)
- Website installation (label: Project Completion)
- Customer acceptance (label: Project Completion)
- Archive Site Materials (label: Project Completion)
- In the powerups, add the "GoodGantt" gantt chart software
- In the middle of the menu bar, turn on GoodGantt. Drag/widen/narrow each task so that it matches your estimated dates
- Add the team members using their email. Assign team members to each task
March 19, 2024
- Spring Break - No Class
March 21, 2024
- Spring Break - No Class
March 26, 2024
Student Project
- Inteview with Client
March 28, 2024
River Gauge Data - Site ID's
- Review https://waterservices.usgs.gov
- Learn more about Instaneous Value Services
- Checkout the "Test The Service" Tool
- Review https://maps.waterdata.usgs.gov/
April 2, 2024
River Gauge Data - URL Generator
- Major Filters: List of sites
- Site or Site Numbers: Site Numbers separated by commas
- Output Format: JSON
- Indent: checked
- Option filter - Date Range - Return all values from a period from now
- Period (All Values): P7D
- Sites Serving Parameter Codes: Lookup "Gage height, feet" (00065)
- Click Generate URL
- Save the URL generated above
- Using the URL above, create a JavaScript file that makes an AJAX call to return the river data in a message.
- You will need to demonstrate your program on Thursday
April 4, 2024
Extracting Values and Dates from the River Gauge Data
- You should have the following snippet working: RiverURL
In your HTML document, add the following for the chart:

<canvas id="chartjs-0" width="400" height="400"></canvas>


In your javascript after the msg has been returned from the AJAX call, add the following:

/* Site 1 */
var dates = [];
var values = [];
/* fLen contains the length of the array (number of values) */
fLen = msg.value.timeSeries[0].values[0].value.length
for (i = 0; i < fLen; i++) {
    values[i] = msg.value.timeSeries[0].values[0].value[i].value
	dates[i] = msg.value.timeSeries[0].values[0].value[i].dateTime
}
var sitename = msg.value.timeSeries[0].sourceInfo.siteName
var sitecode = msg.value.timeSeries[0].sourceInfo.siteCode[0].value
var siteDescription = msg.value.timeSeries[0].variable.variableDescription

/* Put your code here to display a graph of values and dates for Site 1*/

/* Site 2 */
var dates = [];
var values = [];
/* fLen contains the length of the array (number of values) */
fLen = msg.value.timeSeries[1].values[0].value.length
for (i = 0; i < fLen; i++) {
    values[i] = msg.value.timeSeries[1].values[0].value[i].value
	dates[i] = msg.value.timeSeries[1].values[0].value[i].dateTime
}
var sitename = msg.value.timeSeries[1].sourceInfo.siteName
var sitecode = msg.value.timeSeries[1].sourceInfo.siteCode[0].value
var siteDescription = msg.value.timeSeries[1].variable.variableDescription

/* Put your code here to display a graph of values and dates */

/* Continue for Sites 3 and 4 */
- Copy the above code into your River Gauge Data project. Add the code to display at least one of the graphs. I should be able to click the link to run the program.
April 9, 2024
Student Project
- Work on River Gauge Chart 1
April 11, 2024
Student Project
- Complete All River Gauge Charts
April 16, 2024
Student Project
- Work on Student Project
April 18, 2024
Student Project
- Work on Student Project
April 23, 2024
Student Project
- Work on Student Project
April 25, 2024
Student Project
- Project Presentation
